Showing posts with label mame. Show all posts

Thursday, March 21, 2013

MAME: At long last, a cabinet update

So I ended up doing a bunch of work on the arcade cabinet last summer, and have *finally* gotten around to writing a post and uploading the photos. First thing was the painting. I went with a solid black overall, combined primer and paint.

Next up were the speakers. I took a set of old Altec Lansing desktop speakers I had. I popped the grilles off, taped over the Altec symbol and spray-painted the grilles and frames black. I mounted the actual speakers on the inside of the cutouts, screwing them into the MDF. The frames and grilles mounted on the outside, giving a nice finished look to the speaker arrangement. The main speaker/subwoofer sits in the bottom of the cabinet.

Next up was the marquee. I used Richard Kirk's excellent MAME marquee and got it printed at Staples. They were able to print it exactly the size I wanted and laminate it, all for about $7. Here it is installed. Not the best picture, as I was trying to show it all lit up.

Then the coin door. I'm still using the Happ Controls (now Suzo-Happ) over-under mini-door system for the coin door and it went it without a hitch.

Finally, I installed some custom-sized side-art from Game On Grafix. That was a bit pricey, but the overall effect is more than worth it. I don't have the skills to stencil or paint on a nice logo, so this is the easiest way. It adhered quite easily, and is still sticking firmly 7 months later.
Getting the TV in was a bit of a struggle, as this cabinet was planned around the 27" Sony, which is long gone. I got the TV all in there and then turned it on and realized it was set to cable input, not the video-in, and of course the remote sensor and buttons were now wedged up against the inside of the cabinet and the TV anchored in place. Fortunately, the remote worked to flip it to the video input.

One final look at the front:

So the whole thing is largely finished now, but I haven't gotten around to uploading the photos yet. The sensing power bar works well--you open the front, flip the PC on, and everything else in the cabinet comes to life--TV, lights, speakers, coin door lights...
About the only thing left to make it fully complete is a bezel around the TV. Coming soon...

Monday, March 30, 2009

MAME cabinet non-update

A brief update on the MAME cabinet is probably in order after all these years.

Short story--it remains stalled pending basement development. I put it on hold a number of years ago until I had more of the basement finished.

Actually, we now have our combined media room + playroom area finished in the basement, and after I install the baseboard trim in there, finishing up the MAME cabinet is probably next on the agenda.

It's a good time to tackle that--with the new TV downstairs, that frees up the 27" Toshiba that I bought for the cabinet to actually be used for the cabinet.

All that's really left is installing the TV, the fans, painting it, and then installing the marquee and display plastic (already cut and fitted). Oh, I also still have the coin door to slap in there. So there's not really a lot of work to do, and now that I have the media room done, there's a corner to stick the cabinet in all ready and waiting.

Pictures will, of course, follow once this stage is reached.

Tuesday, October 28, 2008

Megaupdate (the kitchen sink post)

So what exactly has been going on around here and what's with the general abandoning of the blog?

Well, as I'm largely writing this for my own diversionary amusement, it's fallen by the wayside in the wake of more important things. I still want to write here, I'm just having problems finding the time--it also turns out that small children are capable of consuming limitless amounts of spare time, though admittedly delivering the goods in the emotional rewards department.

The MAME cabinet work stalled out a while ago--the intent is still to finish it. I've got the back door installed and on, the TV shelf is there, holes are cut for fans, coin door, etc. The light fixture is installed and working, though the lamp is back out pending final assembly.

I also cut the plastic for the front and for the marquee area. For mounting the marquee, I've got the marquee retainer as mentioned previously. For the front glass, I bought some quarter round moulding with 90-degree edges and installed it with one flat edge attached to the cabinet, and the other flat edge facing the front of the cabinet to make a perfect resting place for the glass. I'll probably caulk the left and right edges to reduce noise and vibration and then maybe use some more marquee retainer at the top and bottom.

There are a few reasons for the stall-out though--the next step is going to be lifting the TV up there and adding supports in the appropriate places. However, while I have a spare, heavy 27" Sony television that I could use there, it's not the ultimate TV I want in the cabinet. That would be the (much lighter) 27" Toshiba I purchased a few years ago, currently in use in the living room, the only area of the house suitable for TV watching right now. But now that the finishing of our basement rec room is likely to happen before the cabinet gets finished, I'm holding off fitting the Sony into the cabinet, in anticipation of getting a new TV in the rec room and then upgrading the MAME cabinet to the Toshiba.

So yes, the basement finishing is the other part of this equation. We decided to finish the main rec room area rather than tackling the whole basement at once. That's one giant 16x30 area where the eastern 16x11 will be designated the kids' playroom, the western 16x11 the TV area, with a handy 16x8 DMZ in the middle. I'm debating some sort of invisible barrier that will keep children from wandering over into and otherwise messing with the TV area and the suppositional new TV. I'll post pics as soon as the barrier is installed so you can all look at it and echo R2-D2--oops, I mean Fidgit from Time Bandits by saying, "Oh, so that's what an invisible barrier looks like." Sorry for the mistake. Fidgit is only played by R2-D2. Apparently, it used to take several hours for R2-D2 to get into his Fidgit costume before filming, and of course, all R2's dialogue was redubbed...

The DMZ is also going to be the location of the roleplaying table. Not precisely KoDT though--although the table in question did indeed live a former life as a dinner table, we're playing pulp Rolemaster, so everyone's an investigator, not a knight.

I'm using a mix of homebrew adventures, CoC adventures and even some Shadow World modules for any sequences involving translation to alternate dimensions.

Finally, in order not to give the lie to the title of the post, I'll just have to mention the shortsighted construction of the kitchen sink. Firstly, the left hand sink drain comes down and joins the drain for the right hand side, but it does so at a nearly horizontal level. After several years of washing in the left sink and stacking for drying in the right sink, this horizontal part of the drain was clogged with all manner of really disgusting things. One stomach-churning cleaning later, and we now wash in the right hand sink, with its vertical drain, and dry in the left hand sink. The other daft thing about this sink is that the trap is placed so low that there is zero clearance from the bottom of the trap to the floor of the cupboard, meaning that the U-bend can't even easily be opened let alone easily drained/explored/etc with any kind of bucket underneath it. Frustrating.

Friday, August 18, 2006

MAME cabinet: slow but steady march of progress

In the midst of enjoying the summer, I have managed to get a bit of work in on the game cabinet.

For the coin door, I opted to get a brand-new one from Happ Controls, rather than dig around for a used one in questionable condition that might not be exactly what I wanted. I ended up getting the Over/Under Door Mini System, as it seemed the most cost- and space-effective double door I could find. Rather than dealing with Happ directly, I ordered through Starburst Coin in Toronto. That eased any unexpected customs woes. I was able to order it without the default USA coin mechs, and with some Happ Ultimech coin mechs instead, configured for .984" tokens instead. I also got 10' worth of video game marquee retainer, seeing I was placing the order. It looked to be the easiest way to attach the marquee to the cabinet.

I was going to order some of the .984" Happ tokens, but Starburst Coin doesn't carry them, instead offering custom tokens from the Royal Canadian Mint. The price was excellent at $0.12 each, but I would have had to purchase 1000. Instead, I opted to purchase some MAME tokens from Arcade Tokens (now Arcade Replay). Sadly, the nickel ones are not available, so I had to settle for brass. Going with the MAME tokens was more expensive, but I love having something unique.

All these things arrived quite some time ago, and I'm pleased to report that it all works. The only problem is that the slot on the coin door is large enough to accept a loonie, but the coin mech is not. So inserting loonies into this is currently a no-no.

I've now built both the front door and the drawer, and both are installed. I still have to install the key on the front door. I'll install it just to get the holes cut, and then remove it until after the cabinet's painted.

Next up is the back door, and then all the internals--intake fan for the back door, internal wiring, marquee lamp, outlet fans, TV shelf and all that. It's slowly starting to come together.

Tuesday, February 14, 2006

MAME cabinet: it stands!

So steady progress has been made with the cabinet.

During January, I managed to finish all the cuts of the MDF. Once I reached that point, the pieces sat there for a little while again--it's hard to find time to get down there. If the boys are awake, they want to come down with me. If they're asleep, I can't make a lot of noise down there.

In the end though, I got down there, and was able to place the two cabinets sides on top of each other. Even though they'd been cut out independently of each other, they fit together very well, with only a 1/16" difference between them at most. I sanded out the minor differences in the edges, and rounded the corners.

I then assembled the base. As per the source plans I'm using, the base is in two pieces, and I opted to use some metal strapping top and bottom to hold them together. The strapping means the floor of the cabinet is not perfectly smooth, but I made sure to leave enough room so that the PC case could rest securely on the floor of the cabinet, without being on top of either strap. That's the only thing that needs to go on the floor of the cabinet, so it should be okay.

The wheels went in fairly easily, and I offset the 5" kickplate, front and back, to give my fingers enough room to reach under and lock the wheels.

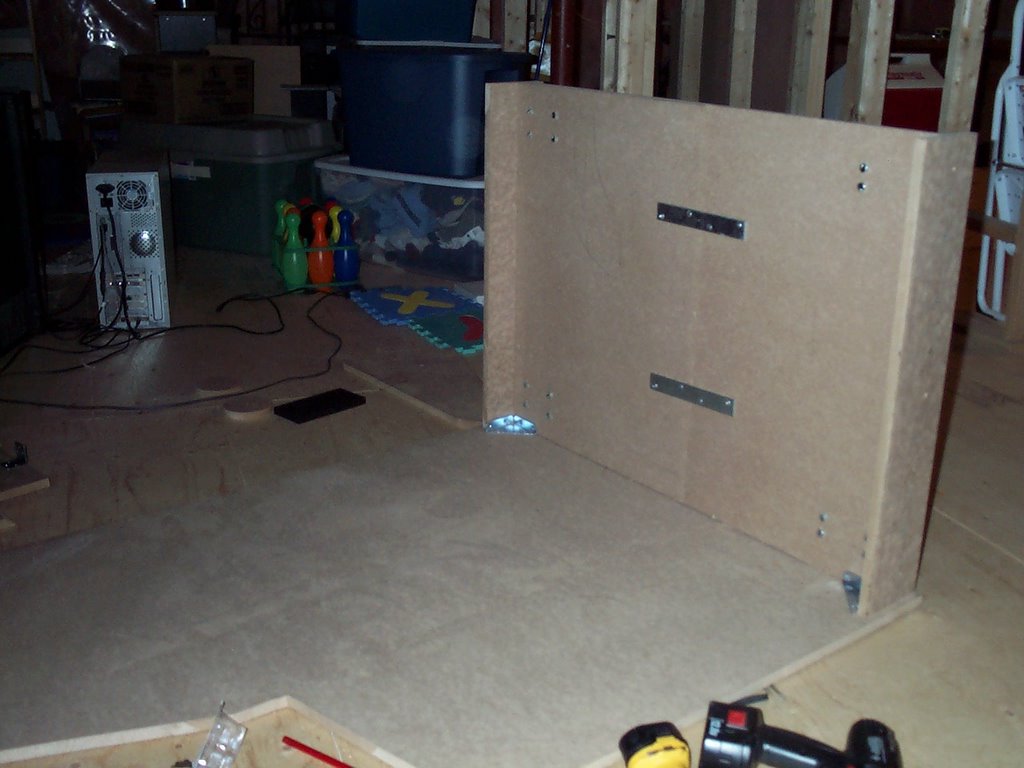
Once that was done, I had the base assembled, and I wasn't sure what the best way was to attach it to the sides. I ended up placing one side on the floor, dropping the base on top of that, and then screwing the corner brackets into place, leaving me with what you see below.


At this point, I stopped to do some thinking about exactly how I was going to get the second side installed.

In the end, I figured out the location for the front supports, rear slanted cover, top, underside of marquee and so on, and stuck them to the inside of the cabinet with small L brackets. I ended up with one side of the cabinet on the floor, and all these pieces of wood sticking straight up in the air. As these are all fairly small pieces, they were fine in the short term with just the bracket holding them in place.

This meant I could then take the second side, and maneuver it on top of this forest of MDF. I rested it on there, lined it up, and then screwed it into the base. Then, I went along and screwed in the inside brackets.

Next up was putting all the screws through the side of the cabinet into the cross-pieces. That went okay, apart from a few near misses. I then flipped the whole thing over onto its other side, and screwed the first side in. This was the side that had only been bracketed in so far.

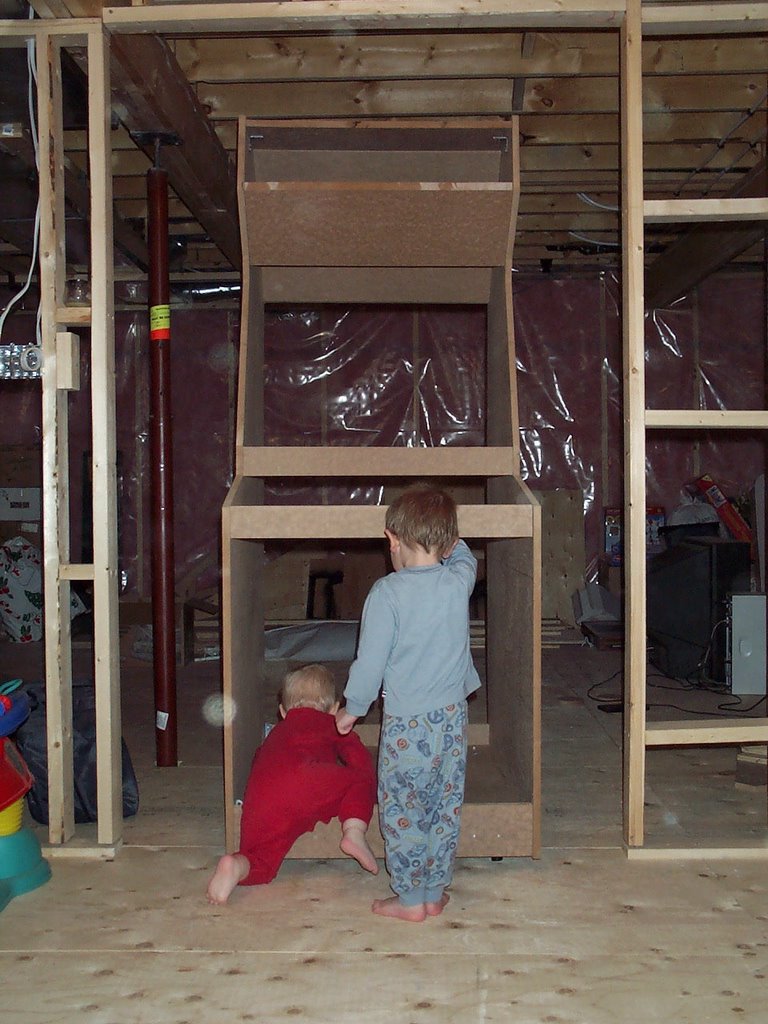
At the end of all that, I had this:


The boys really like it too, and came down just before bed while I was trying to take the photos. Nicholas helped during some of the construction, and actually did help, a sure sign he's getting older. He held some screws for me, at least until he lost interest and then I set him up with a piece of scrap wood, a small hammer, and some nails.

The next step is to work on the doors, front and back, and the drawer. I was planning on using plywood for the doors, as using MDF would have meant purchasing a whole other sheet. The plywood is nice and light too, which puts less stress on the hinges.

The only thing that worries me about that is whether it will paint to the same texture as the MDF. In the end though, if it doesn't, the doors are a fairly easy component to change.

I'm still not sure whether I'm going to look for a reclaimed coin door locally, or just bite the bullet and order one from Happ Controls--maybe I'll do that, and then I can order marquee edging and a bunch of tokens at the same time too.

We'll see. Now that the most time-involving parts are done, the rest should be easy, and work I enjoy a lot more than woodwork. Give me electronics, every time, thank you.

Friday, November 25, 2005

Falling off the planet...

... is far less painful than one would think, especially when it's only figurative.

The reason for the long absence of updates here is obvious when you see the picture below.


That's our oldest (Nicholas, 34 months) with our youngest (Marianne, 2 months). And then we've got Alexandre as well, who's 17 months. Here he is, looking at Marianne.


So we've been pretty busy adjusting to this new person, and helping the kids adjust as well. It hasn't been too bad; Nicholas was young enough when Alexandre arrived that he never really knew what it was like to be the only child... and Alexandre's in the same position viz Marianne... he's going to forget that she wasn't always around.

MAME cabinet building, basement finishing, and interactive fiction game development have all stalled, of course. But the kids seem well adjusted now, and are back to sleeping quite a bit better than they were. The two boys wake up perhaps once or twice during the night each, and Marianne usually sleeps for about 9 or 10 hours at night, which is great.

We finally got around to buying some Duplo for the kids the other day. I'm a big Lego geek, and have piles of Lego sets downstairs waiting for the kids including some big boxes of just bricks that I bought recently. I've got about 3500 Lego pieces in never-opened boxes, not to mention all my "themed" Lego sets from when I was a kid. However, they're just a bit too small for them to play with right now.

We have some Mega Bloks that someone gave us (the big, clunky, non-Lego compatible ones*), and Nicholas liked playing with them, but never for very long.

(*they are actually Duplo-compatible, but only one way. They'll stick to the Duplo, but the Duplo won't stick to them, as the Mega Bloks are much bigger).

The other day, Duplo was on sale at Toys-R-Us, so we picked up a couple of boxes. The Duplo has been the exclusive toy of choice for the kids for three weeks straight now. It's the first thing Nicholas wants to do in the morning, and he plays with them all through the day, and in the evening with me when I get home. It's great. I think the big difference is that the Duplo sticks together so much better than the Mega Bloks, so it's easier for the kids to use, in spite of being a bit smaller. With the way kids tend to build, they don't always pay the most attention to structure, so if your bricks don't stick together well, the structures won't stand up under their own weight.

One of the boxes was a 50th anniversary limited edition Duplo box with some limited edition gold bricks, as loudly proclaimed on the box. Okay, neat, I thought, but no big deal. Well, limited was right. There are just six of the gold bricks, and they're all the small 4-bump one, the smallest Duplo block there is. I don't know why they bothered. The other tub we purchased was a generic large Duplo tub, with a nice assortment of bricks. Not as many pieces as the limited edition, but it was cheaper and had some unique features that weren't in the other one (such as the propeller piece).

There was a limited edition Lego tub available, with gold bricks, for $15. At a paltry 500 pieces, though, it didn't seem worth it. They also had a big red 1000-piece tub with 500 bonus bricks for $30, so we bought that instead. Same price as two limited edition tubs, and 150% more pieces. And given the "limited edition" doublespeak, I'm glad I didn't let the siren lure of golden pieces talk me into buying an inferior set for a measly handful of gold bricks.

I've got some road pieces as well, when the time comes to set up a whole Lego town, but I've got the old style roadplates with the grey border, whereas the new ones have the green border. So the green plates are nice, but if I need any additional plates, I may order the grey ones, just so they match--assuming the grey is still the same as the old. Also, the grey ones are $5.99 for two pieces, and the green are $9.99 for two. Of course, the green are available now, and the grey are backordered until the end of this year or February 2006 for some of the styles.

How can you tell it's nearing Christmas (as Leela says in Futurama, I "must be using an archaic pronunciation"), when I've got an entire blog post filled with talk of Lego? Lego was always my present of choice for Christmas, and was always what I asked Santa to bring. And there were usually a couple of other small boxes of Lego from mum and dad under the tree--prelocated by judicious pre-Christmas shaking... though I can remember being deceived and disappointed by a particularly noisy-pieced puzzle one year. I loved puzzles too though, so I think I got over it...

... apart from growing up into a Lego-obsessed engineering geek. But no one ever said that was a bad thing.

Tuesday, September 27, 2005

MAME cabinet: joystick complaints

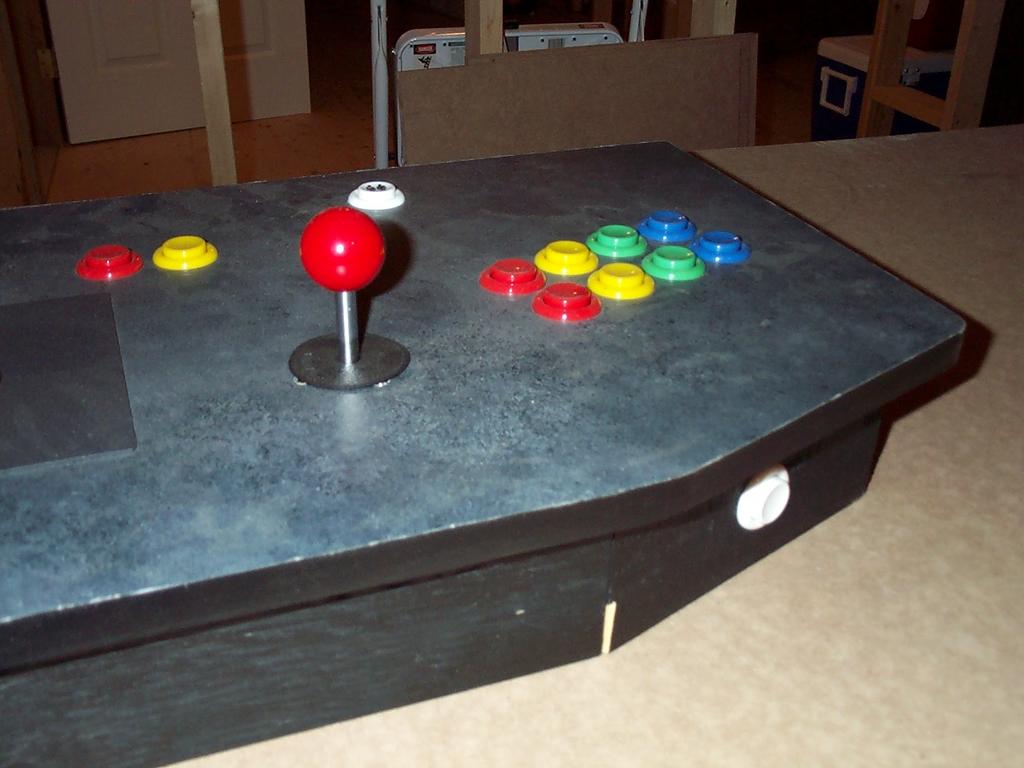
I opted for the J-Stik ball-top joystick from Ultimarc when I put the control panel together.

Overall, it's a nice joystick. The travel is good, the switch action is nice, and I like the 4-way to 8-way switching feature. Playing Pacman with a 4-way joystick is much easier than with an 8-way.

They also top-mounted quite nicely, and I left just enough of a cutout around the top plate that I can reach the screws and remove the joystick without disturbing my laminate... leaving the plate buried in the laminate. Of course, this wouldn't be possible unless the ball-top was also removable. And it is.

This is touted as a feature, and rightly so. However, in the (very) limited MAME playing I've done, with the PC and TV set up in the basement while I'm supposed to be working on the cabinet, I've noticed that the tops have a real tendency to unscrew just under normal gameplay. I'll tighten them up and play for maybe half an hour, and they'll loosen again.

It may not sound like much, but it can really affect the game play when you shove the joystick up and the knob spins in your hand... or even spins off, if you haven't been noticing the increasing looseness. And then it goes bouncing across the floor, sending you scrambling after it to catch it, and then you've got to madly try to thread it back on while Sinistar laughs evilly, or Binky, Inky, Pinkie and Clyde zero in on you. It adds a certain amount of excitement to the games, but it's not exactly what I was looking for.

What I may end up doing is putting a little bit of Loc-tite thread-locker on there. Enough to prevent accidential loosening, but weak enough that I can still break it and unscrew it if necessary.

The cabinet hasn't really progressed much since the last post. I've traced out all the cuts for the second sheet of MDF, and even cut out a few of them. It won't be long now until I can start putting it together.

Monday, September 12, 2005

MAME cabinet: a one-sided discussion

I was on sod duty Friday evening and Saturday morning, and we now have a grass lawn in the back. Putting down sod is great; you go from boring dirt backyard to grass in a matter of hours. It's far more satisfying than the topsoil, and takes far less time to do. I was very pleased with the results, though it is now stubbornly refusing to rain.

Michelle very kindly took the boys out to the grocery store, and then the toy store on Sunday afternoon, giving me about four hours to myself, with the idea that I'd work on the cabinet. I had a few things I wanted to do on the PC, so I got that out of the way, and then went downstairs. I'd put in about an hour of work, and then the power went off in the house. Argh! If it's not one thing, it's another. I finally had some free and clear time to make as much noise and sawdust as I wanted, and the hydro company shackles me.

The power came back on after a couple of hours, and I managed to finish all the cuts to the first sheet of MDF. I now have one complete side panel, which looks pretty impressive standing against the wall.


I maneuvered the second sheet of MDF onto the table, and I'm ready to mark all the cuts on it, and then get cutting. I think I'll just put the existing side panel on top of this sheet, stencil around it, and and then cut. Once both sheets are cut, I'll clamp them together and sand the edges to ensure they're the exact same size.

I also got around to trying the melamine edging on the control panel. It's a 50' roll of black edging that you iron on. I got that done, and it looks pretty spiffy.


Given the amount of effort T-molding is going to take, and the fact that I've got a non-standard MDF thickness (11/16" versus 3/4", which wasn't available), I think I'll just try this edging on the whole panel. Saves me having to router that channel for the T-molding.

It's great to see this thing start to take shape. It's going to be a blast starting to put the thing together.

Tuesday, August 23, 2005

MAME cabinet: why is the work progressing so slowly...

... I hear you not asking.

What with one thing and another, putting up the fence has taken up a lot more time than I would have liked, mostly because the available time to work on it has been limited.

We had family things to go do the last weekends of July, and the first weekend of August, so that really delayed the fence building.

However, it's finally all finished now, except for putting the post caps on top of the posts to keep water from getting into the grain. I just did the gate on Sunday, so now we can just close the gate and throw the kids out of the back door. Of course, all they have to play with right now are weeds and dirt.

I have also finally started cutting bits out from the first sheet of MDF. Hooray! It cuts nicely and with a finishing blade on the circular saw, the MDF gets a really smooth, clean edge on it.

My second sheet of MDF has a bit of a crack in one corner, so I've been trying to plan out how I can cut around it. I'm already making the doors, front and back, out of left-over 5/8" plywood. It saves me buying a third sheet of MDF, and I prefer the idea of a lighter door hanging on there than I'd get with the MDF.

I was also having doubts about the weight of the TV sitting on a shelf inside the cabinet. I was worried it was going to be too heavy--more a conceptual thing though: the TV just seems so heavy when you're trying to move it. I threw a couple of 2x4 scraps on the floor and slapped a piece of plywood across them and proceeded to stand on it. It supported my weight without flexing at all. So if it can support me, it will definitely support the TV, especially if I add some bracing underneath. Thus, my TV stand in the cabinet is going to be made out of plywood. This means one less piece to cut out of the MDF, so I won't have to use the cracked portion.

So far, I've cut out the kickplates, one of the 3.5" spacers for the front of the cabinet, and the front and back halves of the bottom. I've opted to go with a 5" kickplate at the bottom (versus 3.5" on the reference plans) and reduce the door height on the front and back accordingly. I'll probably recess the floor to 1 or 2" above the bottom, but that depends on what sort of wheels I decide to go with.

I also picked up a Dremel tool from a coworker for relatively cheap, along with a Rotozip spiral saw, so those should come in handy for trimming the small fiddling detail bits on the cabinet outline, and even cutting a groove for the T-molding if I end up going that route.

It's nice to see it starting to progress, even if at a snail's pace. Once winter rolls around, there'll probably be more time to work on it, as I don't be building fences or laying sod down.

I will of course be shoveling gargantuan amounts of snow in inhumane temperatures, but that's only to be expected.

Wednesday, August 03, 2005

MAME cabinet: testing the TV out

My Radeon 9250 and cheap Chaintech sound card arrived last week from Tiger Direct and I finally got around to plugging them into the old machine on Sunday evening.

I plugged in an old 20" TV that we've got lying around and set things up so that the Windows desktop would come up on the TV-OUT all the time. The desktop didn't look great, but I increased the font size so it's usable. I fired up Mamewah, and it looked pretty good.

When I launched Pacman to give that a go, I was really surprised at how much better it looked on the TV than it had on the monitor. The sharp edges of all the graphics were softened, and the end result was that it looked much more like Pacman used to look in the arcade.

The picture wasn't perfect, as it's not a very good TV, and it doesn't have S-Video in, so I'm using a homemade S-Video to RCA cable.

With the experiment considered a success, I hauled the old PC downstairs, along with the control panel. When I get a moment, I may set it up with the old 27" Sony, just to see what it will look like. If I get it set up on a table down there, then it can even be used for quick gaming sessions in between working on the cabinet. I've got to keep up my enthusiasm, naturally.

I may have to start thinking about coin doors and mechs again soon, as well as Plexiglass or Lexan for the marquee. Over at Jeff's ultimate MAME arcade machine, he used the marquee retainer PVC from Happ Controls, which looks like a pretty easy way to secure the marquee--certainly beats trying to screw it in place, which can be difficult with some of these materials, especially near the corners. Seeing I'll probably be ordering coin doors from Happ Controls anyway, it might make sense to grab some of this too. It comes in ten foot lengths, but the excess can be sold off to others... such as my brother, who's contemplating a MAME cabinet of his own.

I'm holding off on ordering from Happ Controls yet, though. I want to get nearly finished the cabinet first, because I know the minute I place the order, I'll remember something else I can only get from there.

There's wheels, mounting brackets and a host of other little hardware items that I'm going to need, but I think I'll just depend on local hardware stores for that kind of thing. I'm still not certain exactly what I want for wheels and/or leg levellers on this thing. Ideally, the wheels will be recessed under the unit so that they aren't visible, but you can still push it around easily. Not sure how I'll mount the leg levellers, or how they'll be adjusted once the unit is stationary, but I guess as long as there's enough clearance underneath to reach in with a wrench, that should be fine.

Tuesday, July 26, 2005

A 4x8 sheet of 11/16" MDF...

... is extremely heavy!

I got the MDF delivered along with all the wood for the backyard fence. Those sheets are seriously heavy! The guy who delivered the MDF carried both sheets at once into the garage for me, so I figured I should be able to manage one sheet down the stairs at a time, as I've done with plywood before.

No such luck. This stuff is dense. With Michelle steadying one end, I managed to maneuver one sheet down there, but every time I look at the second sheet in the garage, I lose all desire to try again.

Maybe I should do some cutting of this sheet in the garage.

I'm really eager to get going on the cabinet construction, but it's going to have to wait. I have a pile of wood in the driveway that I want to turn into a fence.

All the posts have been set for the fence, and I got all the fence clips in place. Sunday and Monday evening, I got a few of the runners in place, so one side of the yard is "runnered" at the moment. That represents about 29' of fence, so only another 80' to go, and then I can start in on the fence boards.

Fenced lot, here we come.

Tuesday, July 19, 2005

MAME cabinet: another man's cabinet

I found out about this arcade project in a comment on one of my MAME cabinet blog entries. It looks like they're building a pretty neat little cabinet there, and hitting some of the same stores as me. You've got to love Canadian Tire. They're a little further along on the cabinet end, so I'm going to give a read and see what problems they've encountered.

I am still undecided as to what material I want to use for the cabinet. The plywood option is expensive, but would certainly be the lightest and strongest. MDF is really heavy, and I don't like the way it tends to chip easily. It also tears around screw holes too. Of course, the plywood can be a little harder to work with, and it's easy to chip the top veneer. And there are all kinds of people all over the net building cabinets with MDF, so it can't be that big of a deal.

Monday, July 18, 2005

MAME cabinet: my kids love the control panel

The ultimate goal with my MAME cabinet is to create something that my kids will enjoy. I want them to enjoy some of the same feelings I used to get playing these games.

When I was growing up, I never got to spend as much time in arcades as I wanted to. In fact, until I hit university, I don't think I'd ever been to an arcade as such--more the local 7-11 stores and laundromats that had machines. There was one place in downtown Winnipeg, Magicland, where you paid a flat fee ($5 per hour, I think) and all the machines were set on free play.

I used to go there from time to time in my teens, but it was not the same thing: the games lost their magic when they were on free play. You tended to get hold of a good game and play it to completion, using guy after guy. Or, if the good machines were all taken, you tended to snack: wandering around, taking a nibble at this game, then that game, for just a few minutes each time.

When I was younger, the idea of arcades was also out of the question because, for one thing, my parents didn't view them as a safe place for a 10-year-old to hang out--and rightly so.

At that age, I'd often only see arcades (or just arcade machines) when out somewhere with my parents. I would gaze at them for the longest time, either watching the attract screen or watching someone else play, or just gazing at the vast array of all the machines, if it was an arcade.

It felt like I wanted nothing more in the world than to play those games. I fantasized about my parents noticing and asking me if I wanted to play a few of the games. It never happened, but I dreamed about them handing me a few quarters and telling me to go try some of the games.

Keep in mind that they weren't deliberately stopping me from playing. I suspect if I had asked them for money to play, the answer would have been no, but if I had produced the quarters myself, they might have let me.

That was the other problem, which sounds silly now. Fear. I was nervous about trying these games. I was always a pretty shy kid, and somehow I found it hard to imagine myself boldly walking up and playing. What if someone said something? What if I got kicked off for playing so badly?

So any chance I got to play these games--usually whenever I had a few quarters and could find a place with only a couple of machines--less fear in the smaller places... I played. And really enjoyed it, except for not being very good, due to lack of practice.

When I got to university, and there was a non-smoking arcade in University Centre, and very boring physics classes (it was a repeat of the I.B. physics I'd taken in grade 11) every Monday, Wednesday and Friday morning, I spent a lot of time in that arcade. At least, I did whenever my buddy Wayne was also inclined to bail out on physics. If he wanted to go to class, I usually tagged along. I'd sit there listening for a while, and once the professor got to a particularly boring part, or said something I, in my infinite 18-year-old wisdom, found asinine (such as "We're finished now with the meat and potatoes of this course, and we're moving on to the dessert"), I'd extend my hand to Wayne, and say "Book!" and he'd hand me whatever book was in his bag that he was currently reading. I worked my way through Margaret Weis's "Star of the Guardians" trilogy in that class, along with Wayne's entire Time Wars series.

Now that I've rambled on, let me renew my focus. I want my kids to be able to play these video games in safety and comfort. I also want to be able to set reasonable limits on their playing, through use of tokens rather than quarters. And I like the idea of a dedicated arcade machine that they play in the rec room downstairs, rather than a game console that they lock themselves into their room with and play nonstop.

The two boys are only 2 and a half and 1 year old at the moment, but they've already shown a propensity for MAME. While the control panel was plugged into the desktop computer (for "testing" purposes), they were forever pushing buttons on it, causing random keypresses during my attempts to use Windows, with the requisite hilarity ensuing.

So with the leftover laminate, and some pieces of 1/4" panel I had kicking around, I decided to do something fun for them. I got a bunch of switches, some that I had sitting around, and some that I picked up from Radio Shack The Source, and a few different types of LEDs (clear, red and blue) and wired them all up to a little 9V battery. So now the kids have this laminated panel with 6 buttons of various types on it. Toggle, rocker, momentary, push-on, with each wired up to a different LED. They love it. The 2.5 year old played with it for almost an hour the first time. The 1 year old loves it too, but after a few minutes of playing, he always wants to turn it over and look at the insides to see how it works.

Must be a second son thing: my dad's an engineer. I'm the second son and I became one, and now my second son looks like he's heading the same way... not that it's a problem, just interesting.

Monday, July 11, 2005

MAME cabinet: television selection

My ultimate plan is to use a 27" TV in the MAME cabinet, for cost reasons.

A large computer monitor is cost-prohibitive, and a large arcade monitor is pretty pricey too. A large TV will give a great screen size, and offer video that looks similar to what the arcade monitors look like. It's not perfect--it's a compromise.

The target television needed to have S-Video in, and a nice 27" size, with a fairly flat screen. I also wanted something with a minimal cabinet, i.e. no silly speakers mounted on the side--a look I hate and one that would make the TV too big for the proposed cabinet.

I wasn't planning to get this TV right away, as I'm nowhere near starting work on the cabinet, but with our current Sony displaying more problems every time it's turned on (thanks to kids who like nothing better than switching it on and off) when the Toshiba 27A34 went on sale at Sears for $260 CDN, I decided to spring into action.

It's a pretty nice television. It's got component video inputs, which is unusual on that size of a tube TV. The screen isn't pure flat, but pretty close--it's flatter than my 16-year-old Sony. It also has quite a smaller cabinet than the Sony, and is about 40 pounds lighter (at 80 pounds) than the Sony, so I'll feel better about putting it into the cabinet.

It's even, in theory, controllable via the universal remote that I have on my digital cable box. Unfortunately, the Toshiba setup codes for the universal remote all start with 0, and I can't enter 0 on that remote anymore, thanks to the day my 1-year-old introduced the remote to a tall glass of water. Numerous buttons never recovered from that incident, the 0 among them.

So for the time being, the new Toshiba is replacing our Sony upstairs, the idea being that I'll switch back when the arcade cabinet is closer to completion... or perhaps not. Maybe I'll find a way to make the Sony work in the arcade cabinet on a temporary basis... until we can get our dream TV purchased.

So I ordered a component video cable from RP Electronics, who sell a 6-footer for $15, a far cry from the $50 that most retail stores want. Seeing I was ordering, I also grabbed a couple of 120mm AC fans for the MAME cabinet. They've got some nice ball bearing AC fans with metal impellers, which should help them last a little longer. I also ordered a few other miscellaneous goodies that will be useful in the guts of the cabinet (AC plugs with wire leads, power bar with EMI/RFI filtering, external AC socket that will allow me to plug computer power-supply style cords into the cabinet to power it--much nicer than having a static cord sticking out of the box).

As it stands, the TV gives a very decent picture, even though, due to someone, most likely one of the boys, or maybe even me, treading on the end of the S-Video cable from the amp to the TV while it was unplugged and bending the shell, it's only running on a composite cable at the moment. Colours look bright and vivid and it was great to fire up LOTR:FOTR the other day and look at Orthanc without it being all squiggly.

The gun on the Sony was off, so most straight lines were squiggly, though you'd be amazed at how well the brain ignores that sort of thing and just sees the line as straight. I used to have to pause the image to verify that it was happening. It was really noticeable on vertical wipes though, where a straight object was being drawn on the screen, and you could see the bits of it shift as the picture was wiped on to the screen. Most noticeable on the boys' Baby Mozart DVD. Maybe I should drop that in and check it.

A parent *and* a geek: using a kid's video to check out my new TV. Sigh.

Friday, June 24, 2005

MAME cabinet: routering and laminate application

My parents have been visiting us from Edmonton for the past week, and my dad brought his router along so that we could do some routering work on the control panel.

In order to get maximum height out of my Ultimarc joysticks, I wanted to top-mount them under the laminate. So we routered down just enough to fit the top plate, and then we drilled out the screw holes in the top plate so that the screws would countersink a bit. We were able to get the plates mounted nicely in the top of the control.

Then came laminate adhesion time. I had picked up some contact cement made by LePage's to glue the laminate to the plywood. It's pretty nice stuff, cleans up with soap and water, spreads easily, has no toxic components.

We applied a fairly thin coat to both the plywood and the laminate, waited about an hour, and then just jammed them together, using a rolling pin to push the laminate down into place. The bonding was immediate, and very strong, and we had the really neat-looking control panel pictured below.

Control panel with laminate
Control panel with laminate (click to enlarge)


We left it to firm up until the next day, just in case. The last thing I wanted was for the laminate to start pulling away when we started routering.

We began the next day by routering around the edge of the laminate, giving a nice clean edge--in fact, that's shown in the picture above.

We also drilled down and then routered around all the button, trackball and joystick holes, cleaned up all the edges and then, deep breath, I was ready to go, starting the wiring.

I got the buttons and everything else installed, chose a suitable mounting point for the Optipac and Ipac boards, screwed them into the underside of the panel and then started on the wiring. I opted to use the quick-connect crimps, instead of soldering just in case I wanted to rewire things some day.

After working on it over a couple of evenings, I had all the crimping and connections finished, and the finished control panel was ready to go.

(mostly) finished control panel
mostly finished control panel (click to enlarge)


So I plugged the whole thing into the PC and tried it out. It all worked perfectly, and my dad and I even managed to get in a two-player soccer game on MAME.

So I now have a fully working control panel. It's not completely finished. I've got to add the trim around the front edge, and I'm going to touch up the paint on the front to remove a couple of blemishes. The MAME fund was depleted with the purchase of all the controls, so everything's on hold for a few weeks until we build it up a bit more. There have been quite a few 27" TVs on sale for $200 lately, and I've almost picked one up. Our current main TV is on the fritz, so we're going to need another one soon to tide us over until we can afford our dream TV... and once we get the dream TV, whatever main TV we have (27" or under) will go into the MAME cabinet.

Tuesday, June 14, 2005

MAME cabinet: the quest for laminate

The next step is the control panel sides. They're just five strips of plywood, 3 1/2" high, that raise the control panel up from the cabinet. That gives just enough height for all the buttons and wiring underneath, and is low enough that I can place the 3 1/2" strips upright in the mitre saw to give them the nice angled edges I wanted.

I used 1/2" long dowel pegs to attach the sides into the bottom of the control panel, and copious amounts of carpenter's glue. After that, I painted it black, using some Tremclad textured black spray paint. I wanted a dark laminate, so black sides were a pretty safe choice.

Control panel sides
Control panel sides (click to enlarge)


And now the quest for laminate began.

I work just around the corner from Floform Countertops, who do all kinds of custom countertops, and have a showroom with loads of different styles of Formica. I heard that they had a bin of leftover pieces you could pick through, so I gave them a call and told them what I was looking for... a small piece of laminate, preferably with a dark pattern. The salesperson I talked to wasn't very helpful, and every time I tried to ask about leftover pieces she just kept saying, "You'll have to buy the whole sheet." I asked how much that was: anywhere up to $4 a square foot, depending on pattern, texture and so on. Given that a sheet is 4x8, we're talking a stupid amount of money.

I gave up and went to Home Depot at lunch. They had 4x8 sheets for $25-$30 for light colours and light patterns, but anything dark with a nice pattern was in the $50 range. I asked if they sold cut sheets. No. Would they sell me a whole sheet and then cut it down for me so I could put it in my car? No. Well, all right, if you'd rather not make the sale...

I headed to McDiarmid Lumber, which is a smaller hardware store--I think they've got stores in (northern) Ontario, Manitoba and Saskatchewan. I spoke to someone there, and he said all their laminate was 4x8 sheets, but he told me I could go to Floform and pick through their bin. I explained to him the reception I'd gotten, and he called someone he knew at Floform to ask... turns out they used to do that thing with the bin, but now they use virtually all of their waste material. Argh.

So as a last resort, I headed to Windsor Plywood on another lunch hour. They're a western Canada retailer of plywood and construction supplies. I looked around there for a long while, and finally, tucked off to one side, I found a little area that had a bunch of 4x2 sheets of laminate for $7. I bought the one shown below. It's not exactly what I was envisioning, but it's grown on me since I picked it up, and I now think it's pretty cool. The price was right, too. Because it's a cut sheet, there's no product information on the back anywhere, so I can't tell you what brand name it is or what the name of the pattern is.

The lucky laminate
The lucky laminate (click to enlarge)


Now I've got to get it glued onto the control panel. As I want to top-mount the joysticks underneath the laminate, I'll have to put the joysticks in place on the panel, drill holes in the right place in the laminate, apply the glue, and then stick it down very carefully, making sure I get the holes for the joystick lined up, while making sure I don't bubble the laminate anywhere. The more I think about it, the more I'm leaning towards mounting the joysticks from below. If I do them from below, I won't have to wreck the laminate if I ever want to replace them with a different stick. Hmmm, something to think about...

MAME cabinet: panel construction

I purchased a 1 1/8 hole saw for drilling the button holes and was all ready to begin marking and drilling holes for buttons and joysticks.

I looked at my 48x19 piece of plywood. I looked away. I looked back. Drilling holes in this thing is a big step. If I change my mind about anything after the fact, I would have to cut a new piece of wood.

But I'd prototyped the whole thing on a 48x19 piece of cardboard, and it was all good, so I should be able to begin with impunity.

I grabbed the piece of wood, and instead of beginning to mark out the hole locations, I lopped six inches off each side and five inches off the back, winding up with a 36x15 control panel.

What? Why? Well, I've been looking at the size of the cardboard prototype, and it just seems too darn big. And, I realised that the control panel actually built and placed on Jeff's ultimate MAME machine is a much smaller one than what he put in his cutout plans.

Far happier now, I proceeded to mark out all the locations, and did a little bit of drilling, and ended up with what you see here.

Plywood control panel
Plywood control panel (click to enlarge)


It looks a little asymmetric, mostly because the joystick holes aren't jigsawed out yet, but it's a much more manageable size. It should now overhang by about 3" per side, instead of 9".

Next on the agenda: jigsawing out the joystick and trackball holes.

I also need to construct the sides of the panel and attach them. Oh, and I've got to find some material to put over top of the panel. I'd like to use a laminate of some kind, but I've got to find somewhere I can buy a smaller sheet.

MAME cabinet: panel prototyping

Based on the plans here, which I'm using as a starting point, I made a layout in Visio of a 48x19 control panel.

I used information from Ultimarc's website to make sure I had the sizes of all the parts correct. The Ultimarc buttons need a 1 1/8" diameter hole, while the actual surface area occupied by the button and the plastic surround is 1 5/16". Holding an imaginary joystick in one hand and resting my fingers on the kitchen table, I decided that 1 1/2" center-to-center made for good button spacing.

I've also planned for a spinner, even though I haven't ordered one. The Optipac board can interface with one, so I left space for it above the trackball. The trackball buttons will double as the spinner buttons. I like the look of the Vortex spinners from Oscar Controls, so I made plans for an appropriately-sized hole, with a view to ordering a spinner "some day".

By the time I finished the Visio work, my parts had arrived, and sure enough, no duty or taxes to pay. Nice. I hauled them all out of the box and tried out the buttons and the joysticks, but after that, they sat around for a few days.

I cut out a 48x19 piece of 5/8" plywood to use for the panel, but I wanted to prototype things before starting to cut into it.

So I made a double-layered cardboard template out of some old boxes in the basement, and pencilled in the locations for all the components.

Then, I cut out all the holes, and installed the parts. It's far from elegant-looking, but gives a really good idea of how the whole thing goes together.

Prototype control panel
The prototype control panel (click to enlarge)


I used the Neo-geo colour layout for the buttons, and tried everything out to get a good feel for the joystick. I want to top-mount the joystick, if possible, to get the extra height. I tried the joystick mounted from below (along with a 1/2" offset to account for the thickness of the plywood versus the cardboard), but it was just too low.


Button layout detail
Button layout detail (click to enlarge)


So everything seems pretty good. The distance between the two joysticks is a bit large to comfortably play Total Carnage, Robotron or Battlezone, but I figure the firing for those games can always be mapped to buttons. I'm not a purist, and because I've only got two joysticks anyway, two-player Total Carnage is going to require firing via the buttons.

With the prototyping done, the next step is to start cutting holes in my piece of plywood...

MAME cabinet: research and parts purchase

With a cabinet design selected, and a couple of months of building up the MAME cabinet savings, it's time for some control panel parts research.

From playing these games using my PC keyboard, I've found it doesn't take much for the keys to overlap or ghost. Some aggressive playing of Outzone, and I usually hear the telltale speaker beep. I don't want to try hacking a modern PS/2 or USB keyboard. While the interfaces themselves support high levels of key simultaneity and rollover, the keypad inside these keyboards is usually a matrix style.

A keyboard encoder is going to be essential. I thought briefly about developing my own, but when I weigh the cost of buying one versus the lengthy (though enjoyable) development cycle of creating my own, it just isn't worth it. I don't want to suffer the delay it will incur, not to mention laying out the board, getting it fabricated, and so on.

After a lot of reading online, and thinking about how many buttons I wanted in total, I've decided the Ultimarc IPAC2 will be more than adequate for my planned two-player control panel. And at $39 USD, it's considerably cheaper than the $120 USD for the Hagstrom KE72, another board I considered, but have discarded. It's overkill for my needs, and too expensive as well.

So I'm going to order an IPAC from Ultimarc, and I thought I might as well get the Optipac from there too, for trackball control.

But where to get the rest of my stuff? Buttons, joysticks and so on.

Lots of folks on alt.games.mame purchase parts through Happ Controls, but I'm not sure I want to do that. The duty to ship from the US to Canada is quite high on this kind of thing, and you usually end up paying GST (7% sales tax) at the Canadian border on stuff from the US. Not to mention the $5 handling fee just to have Canada Customs touch the thing.

I'm already going to order the Optipac from Ultimarc (in the UK), and they sell just about everything I need, so I'll go ahead and order my buttons, joysticks and trackball from there as well.

I read a review of joysticks in general here at Arcade Controls, and various postings on alt.games.mame. I'm leaning towards the Ultimarc J-Stik, as it has a longer throw than their other sticks, and quieter microswitch operation. I read a J-Stik review at Retroblast, and now my mind is made up. It's the ball-top J-Stik for me.

I ordered two J-Stiks, and a pile of buttons. I opted for eight per player, which sounded like overkill, but I want to make sure I get four in a row for Neo-geo games, and also two rows of three for some of the fighting games. I also want some buttons around the trackball. I'm left-handed, but mouse with my right hand, so I want the trackball buttons left of the ball. However, I also want support left hand trackballing, so I'm going to put the same buttons to the right of the trackball as well. I also ordered some Player 1 and Player 2 start buttons (with the little logoed graphic), and four more "general use" buttons, probably for credit buttons to begin with. So the grand total on the order is 26 buttons.

With the order placed, it's waiting time. While I wait for the order to arrive, my next step is drafting the control panel layout in Visio...

MAME cabinet: making the decision

Playing MAME is ultimately unsatisfying. That sounds a little odd, but bear with me.

I love playing MAME, fooling around with a lot of these old games from my childhood. There are many games in MAME I remember vividly. Some, I played in places like Chuck E Cheese in southern Ontario, pumping in token after token during my friend Ben's birthday party. His dad even supplied all the tokens--how great is that? But there were other games I rarely got to play.

There was a laundromat near school when I was about 12. They had Choplifter and a couple of other games. I remember going there over the lunch hour to watch: the same guy always seemed to be playing Choplifter, and I remember aching to play. I wanted nothing more than a chance to play, but the machine was always occupied. I had played Choplifter on my Apple ][ at home, but this looked so much more exciting, so much more interesting. I even fantasized about this guy getting past the first stage and then handing the controls to me to let me play. It never happened, and the couple of times that I got a turn on the machine, I died very, very quickly.

With the advent of MAME, I could play arcade Choplifter all I wanted. I could possibly even play enough to get good at it. But sitting using a keyboard to play was nowhere near the same as the original arcade experience. I hemmed and hawed and started looking around on the net at what other people had done--creating control panels or full cabinets.

With two small boys already, and another child on the way, how neat would it be to have a MAME cabinet down in the basement rec room (once it's finished) ? The rec room, currently only framed in, is 28x16. The left side will be the entertainment area, with the TV and some couches. The opposite side is going to be a playroom area.

But that leaves an area about 10x16 in the middle that's going to be largely empty. Sounds like a perfect place to set up an arcade cabinet. It will be a really neat thing for the kids, and being able to charge tokens for playing means a lot better control of their gameplay than if they just had a game console.

So a few months ago, I took the plunge, and started slowly saving towards a MAME cabinet. The kids are so young, and the basement so unfinished, I've got a lot of time to create this thing. I'm going to create the control panel first--that part's a little easier than the rest, and it's something I can use right away on the PC upstairs too. I also have a lot of plywood left over from creating the subfloor in the basement, so I can make the panel out of nice, strong 5/8" plywood.

After a lot of looking around the net, I've decided to create something similar to Jeff's ultimate MAME machine. He has pretty comprehensive plans on his site, and while they aren't perfect, they'll certainly give me a good basis, and I can change a few things as I went along.

I told Michelle all about my plans, and she was supportive, though not necessarily too enthusiastic. I ended up finding another cabinet site with pictures of the creator's kids playing away, and said "That's what it's all about." She took a look at the kids playing, and became a lot more interested. When I talked about the token idea, and being able to impose limits on the amount of gameplay, and all the two player cooperative games that were out there, she agreed it would be a really neat thing to have.

So with official permission, I'm off to the races. All I need is a little bit of funding built up, and I can start.